RM Monitor can be programmed to restrict/allow users access to one, several, or all locations within a chain. For example, if you have several locations in a chain, you may want the regional managers to have access for data belonging to all stores in the chain but want to restrict the store manager to access only the data for their store. By default, any new user will have access to all locations until programmed otherwise. The “Manage Restaurant Access” function is typically used when for chains with multiple locations. Single store users will have little need for this function. Access and restrictions to restaurants are programmed under the Manage Restaurant Access tab in the RM Monitor Admin page.
The Setup Restaurant Access form is broken into three sections:
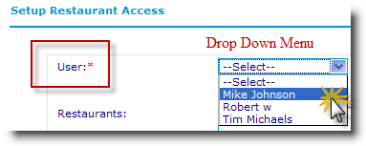
Users- The drop down menu in this field alphabetically lists
Allow/deny- The option will toggle allowing you to deny or allow access to restaurants. Choosing the toggle option largely depends on the how many stores you have in the chain. If you have several stores in the chain and want to restrict a user access to a single location, you would want to select the deny option to restrict access for all restaurants except for the stores selected in the “Restaurants “section below. Conversely, it will be easier to allow access to all restaurants except the selected ones (restaurant section) if you want to grant access to multiple stores with the exception of a few.
Restaurants- This section will be populated with all restaurants belonging to the chain. You may select one restaurant or several by clicking and dragging the mouse across the list of restaurants or using the standard windows option of holding down the “ctrl” key while clicking on the selection from the list.
As an example, we will take a user and restrict access to only one location: